Aug 5, 2026
Off-Camera Flash Photography for Beginners: Your First One-Light Setup
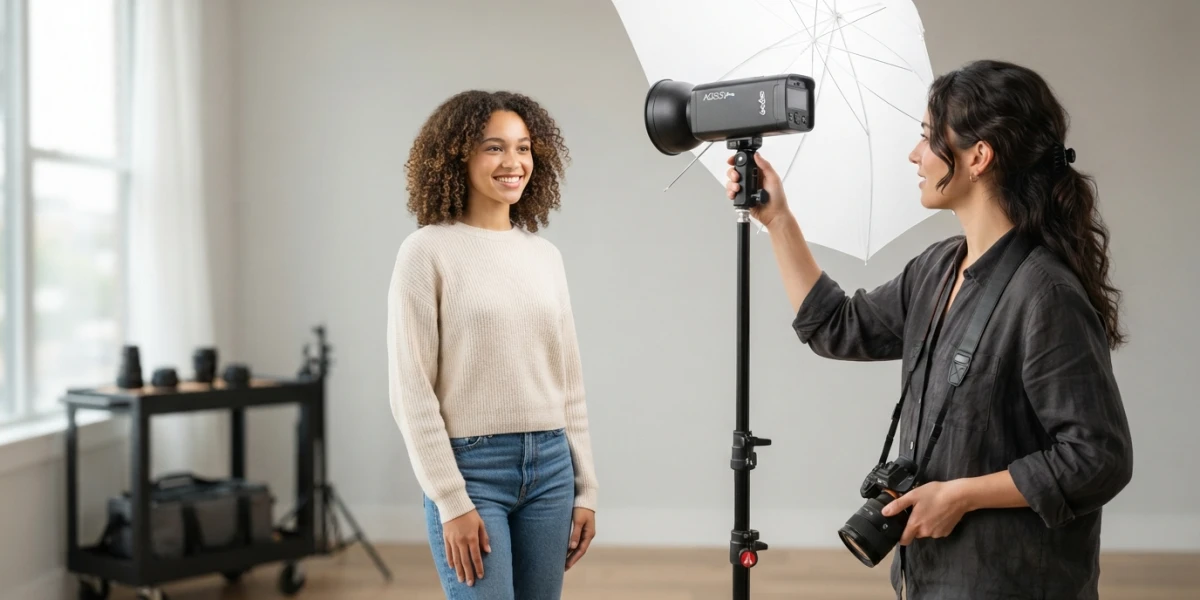
Image generated with AI
Great stock lighting is rarely found — it is built. One speedlight off the camera shoots product photos with clean highlights and portraits with real direction, no studio walls required. Off-camera flash photography for beginners comes down to three decisions: gear, settings, and placement.
Why Off-Camera Flash Is a Stock Superpower
Available light is beautiful, but it is also a moving target. The sun crosses the sky, clouds roll in, and the window light that flattered your subject at ten in the morning is gone by noon. A flash off the camera removes that dependency: once the light is positioned and the power is dialed in, every frame is lit the same way, whether you shoot ten images or five hundred.
That predictability is exactly what stock buyers pay for. Designers assembling a campaign need a set of images that look like they belong together, and a photographer who can reproduce the same lighting on a Tuesday afternoon as on a Friday morning can deliver a consistent series from a single session. Product shots and portraits made with controlled light also tend to license better than snapshots taken with whatever light happened to be in the room, because the subject is shown at its best and the buyer does not have to fix color casts or blown areas in post.
The Minimal Gear List
You do not need a studio to shoot with off-camera flash. A complete one-light kit fits in a camera bag and costs a fraction of what most photographers expect. The essentials are:
- A speedlight with manual mode. Any brand works; manual mode matters more than brand loyalty because it lets you set the power yourself instead of letting the flash decide.
- A wireless trigger and receiver. This is what gets the flash off the hot shoe. Many modern cameras have wireless triggering built in, which saves you the receiver.
- A light stand. Even a compact stand gives you the height and angle control that holding the flash in your hand cannot.
- A modifier. An umbrella gives soft, flattering light for portraits; a small softbox is better for product work where you want controlled, even illumination.
Entry-level kits that bundle a trigger, receiver, stand, and umbrella sell for roughly $150 to $200, which is all the hardware a beginner needs to start. Two optional additions are worth having: a small bounce card to fill shadows, and a CTO gel to match the flash color to warm indoor lighting when you mix light sources.
Settings That Work the First Time
When you switch from shooting with ambient light to shooting with flash, forget most of what you know about exposure. The flash duration is far shorter than your shutter speed, so shutter speed no longer controls how much flash reaches the sensor. Three settings matter most.
Camera Mode and Sync Speed
Put the camera in full manual mode. Set the shutter to your camera's sync speed, usually 1/160 or 1/200 of a second. Slower speeds let ambient light bleed into the frame and muddy the look, while faster speeds risk a black band across the image where the shutter curtain shadows the sensor mid-flash. Staying at sync speed keeps the flash as the dominant light source, which is the whole point.
Aperture Controls the Flash
With the shutter locked at sync speed, your aperture and ISO control how much flash light reaches the sensor. Stop down to f/5.6 or f/8 for product photography, where you want the whole object tack sharp. Open up to around f/2.8 for portraits when you want a soft background and subject separation. Keep ISO low, between 100 and 400, so the shadows stay clean instead of turning grainy.
Flash Power: Start at 1/4 and Adjust
Set the flash to 1/4 power and take a test shot. Check the histogram rather than the rear screen, because the screen brightness lies to you. If the image is too dark, raise the power or open the aperture; if it is too bright, do the opposite. Remember the inverse square law: moving the flash twice as far from the subject cuts its light to a quarter, so small changes in distance demand large changes in power. Adjusting from 1/4 power gives you room in both directions.
Three One-Light Setups You Can Shoot Today
With one light and the settings above, three classic placements cover most product and portrait needs. Practice them in any room and you will see results immediately.
45° Key Light for Portraits
Place the stand 45 degrees to one side of your subject, with the flash slightly above eye level and pointing down. This is the classic portrait position that produces the Rembrandt pattern, the small triangle of light on the shadowed cheek that portrait photographers have used for centuries. Use a softbox or umbrella here so the shadows fall off gently instead of carving hard lines into the face.
90° Side Light for Texture
Move the flash to a 90-degree angle, directly to the side of the subject, to sculpt texture. Side light skims across surfaces and makes the grain of wood, the weave of fabric, or the bubbles in a drink visible in a way that frontal light flattens away. Choose a soft modifier for a gentle mood or shoot without one for a harder, more graphic look on textured product shots.
Backlight for Separation
Put the flash behind the subject, aimed back toward the camera, to create a rim of light around the edges. Backlight separates the subject from the background, which is invaluable for lifestyle shots where you want the person to pop out of a busy scene, and for product silhouettes that look premium against a dark backdrop.
Mixing Flash With Window Light
Your flash does not have to work alone. A hybrid approach produces some of the most natural-looking commercial images: expose the ambient light one or two stops below normal so the room reads as dim but visible, then let the flash fill in the subject. The result looks like beautiful window light even on an overcast day, and buyers respond to images that feel lit but not flashy. Watch your color temperatures, though — daylight flash against warm tungsten bulbs in the room will look blue-orange and wrong. A CTO gel on the flash brings the two sources into agreement.
What Buyers Notice in a Well-Lit Image
Understanding how buyers evaluate light makes you a better seller and a better shopper. On the seller side, well-lit product images license consistently because they survive contact with a design layout: no blown highlights to fight, no color casts to correct, no muddy shadows that make a product look cheap. If you shoot a series for a brand campaign, reproduce the same light setup for every item so the set reads as one family.
On the buyer side, when you are choosing stock, check the highlights are not burned out, that white surfaces are actually white, and that the shadows still contain detail. Those three signals are the difference between a produced image and a snapshot, and they are the same signals a reviewer at a stock agency looks for when deciding what gets accepted.
Common Beginner Mistakes
Most off-camera flash frustration comes from a handful of repeatable errors. The flash is too strong, blowing out highlights before you notice on the screen. The shutter is faster than sync speed, producing a mysterious black band across the frame. The modifier is missing, so the bare flash throws harsh specular highlights. Color temperatures are mixed, leaving skin tones with an odd cast. And gear fails mid-session because the spare batteries and backup trigger stayed at home. Each one has a simple fix once you know what to look for, which is the entire advantage of practicing with one light in a controlled setup.
Conclusion
Off-camera flash photography for beginners is not about expensive equipment — it is about one speedlight, three settings, and three light positions. Lock the shutter at sync speed, use the aperture to shape the flash exposure, start at 1/4 power, and move the light around your subject until the highlights are clean and the shadows have detail. The next time you browse a stock library, look closely at how the product and portrait images are lit; that control is what separates the images that sell from the ones that scroll past. Then build the habit yourself, and your own portfolio will start to look produced instead of lucky.
Related articles

Looking for the perfect stock photo?
Browse thousands of premium photos and 4K videos, pay per download.
Browse the collection